Getting started with SourceCraft
SourceCraft is a platform you can use to develop source code, perform version management, test, assemble, deploy, and maintain software products. It is a code repository management system for git with error tracking and a CI/CD pipeline.
For more information about working with Git, see Getting started with Git.
To get started:
- Sign up.
- Create a repository.
- Check out the test CI process.
- Set up your environment.
- Add an SSH key to SourceCraft.
- Clone the repository.
- Make changes to the new branch.
- Create a pull request.
- Merge with the main branch.
Sign up
-
If you do not have a Yandex ID yet, sign up.
If using your social network profile to log in to Yandex, create a username and password.
-
On the SourceCraft homepage, click Log in and select the Yandex ID profile you want to use to sign up for the service.
-
Select the organization you are going to use to work with the service.
If you already have an organization registered in Yandex Cloud, you can use the same one in SourceCraft.
If you have none, an organization will be automatically created for you to work with SourceCraft.
You can also create a new organization.
Tip
To authorize corporate accounts in SourceCraft using single sign-on (SSO), you can use Yandex Cloud SAML-compatiable identity federations.
-
Click Proceed .
-
On the page that opens, fill out the profile information:
- Name: Required field
- Country
- City
- Company
- Name
- Bio
- Links
You can also add a profile image and a background.
-
Click Looks good to me, open dashboard.
Create a repository
- In the left-hand panel, click Create repository.
- Under Your new repository details:
-
Select Blank repository to create a new repository.
You can import an existing repository to SourceCraft.
-
In the Name field, specify a name for the repository, e.g.,
test-repo. The name may contain the following ASCII characters: lowercase and uppercase Latin letters, numbers, commas, hyphens, and underscores. -
Optionally, in the Description field, enter a repository description.
-
-
Under Repository template, click Browse templates, select suitable repository template, and click Use template.
Templates contain a preinstalled CI/CD configuration and standard project files.
To view the template contents, click Preview.
- Under Visibility, select Private for repository access type. Only users invited by you will be able to access the repository.
- Click Create repository.
Check out the test CI/CD process
When initializing the repository, a test CI/CD process will be initiated.
Check the CI/CD process:
- Under Code on the repository page, go to CI/CD.
- Select a running workflow.
- The page that opens will display all workflow tasks, cubes (task steps), as well as statuses and execution results.
Set up your environment
-
Create a pair of public and private SSH keys for your SourceCraft account:
Linux/macOSWindows 10/11Windows 7/8-
Open the terminal.
-
Use the
ssh-keygencommand to create a new key:ssh-keygen -t ed25519 -C "<optional_comment>"You can specify an empty string in the
-Cparameter to avoid adding a comment, or you may not specify the-Cparameter at all: in this case, a default comment will be added.After running this command, you will be prompted to specify the name and path to the key files, as well as enter the password for the private key. If you only specify the name, the key pair will be created in the current directory. The public key will be saved in a file with the
.pubextension, while the private key, in a file without extension.By default, the command prompts you to save the key under the
id_ed25519name in the following directory:/home/<username>/.ssh. If there is already an SSH key namedid_ed25519in this directory, you may accidentally overwrite it and lose access to the resources it is used in. Therefore, you may want to use unique names for all SSH keys.
If you do not have OpenSSH installed yet, follow this guide to install it.
-
Run
cmd.exeorpowershell.exe(make sure to update PowerShell before doing so). -
Use the
ssh-keygencommand to create a new key:ssh-keygen -t ed25519 -C "<optional_comment>"You can specify an empty string in the
-Cparameter to avoid adding a comment, or you may not specify the-Cparameter at all: in this case, a default comment will be added.After running this command, you will be prompted to specify the name and path to the key files, as well as enter the password for the private key. If you only specify the name, the key pair will be created in the current directory. The public key will be saved in a file with the
.pubextension, while the private key, in a file without extension.By default, the command prompts you to save the key under the
id_ed25519name in the following folder:C:\Users\<username>/.ssh. If there is already an SSH key namedid_ed25519in this directory, you may accidentally overwrite it and lose access to the resources it is used in. Therefore, you may want to use unique names for all SSH keys.
Create keys using the PuTTY app:
-
Download and install PuTTY.
-
Add the folder with PuTTY to the
PATHvariable:- Click Start and type Change system environment variables in the Windows search bar.
- Click Environment Variables... at the bottom right.
- In the window that opens, find the
PATHparameter and click Edit. - Add your folder path to the list.
- Click OK.
-
Launch the PuTTYgen app.
-
Select EdDSA as the pair type to generate. Click Generate and move the cursor in the field above it until key creation is complete.
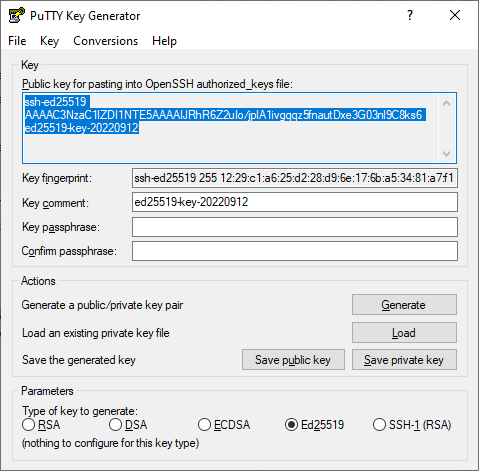
-
In Key passphrase, enter a strong password. Enter it again in the field below.
-
Click Save private key and save the private key. Do not share its key phrase with anyone.
-
Click Save public key and save the public key to a file named
<key_name>.pub.
-
-
Launch the SSH agent:
Linux/MacOSWindows-
Run this command:
ssh-agent -s -
For the SSH agent to start on login, add the launch command to the
~/.profilefile:ssh-agent -s
- Open the Start button context menu.
- Select Computer Management.
- Go to Services and Applications → Services.
- Open the context menu of the SSH agent service and select Properties.
- On the Main tab, change the startup type from Off to Automatic.
- Click OK and start the service.
-
-
Add a key to the SSH agent:
ssh-add <private_key_path>
You can also access the repository using a personal token (PAT).
Add an SSH key to SourceCraft
- Open the service home page.
- In the left-hand panel, click Homeand go to Access → SSH keys.
- On the SSH keys page, click New SSH key:
- In the Key name field, specify a key name.
- In the Content field, paste the contents of the public SSH key file.
- Click Add SSH key.
Clone the repository
-
In the top-right corner of the repository page, click Clone.
-
Copy the link for cloning the repository from the SSH field:
-
In the terminal, run this command:
git clone <link_for_cloning_repository>To clone the repository via port 443, specify the port number in the URL:
git clone ssh://ssh.sourcecraft.dev:443/<organization_slug>/<repository_slug>.gitHere is an example:
git clone ssh://ssh.sourcecraft.dev:443/sourcecraft/sourcecraft.gitFor more information on using SSH over the HTTPS port, see this GitHub guide.
-
Go to your cloned repository:
cd <repository_name>
Make changes to the new branch
-
Create a new branch for the changes and push it to the remote repository:
git checkout -b new-feature git push -u origin new-feature -
Make changes to the repository files; for example, edit
README.md. -
Add the modified file to the
gitindex, then commit and push the changes to the remote repository:git add . git commit -m "updated README.md" git push origin new-feature
Create a pull request
- Under Code on the repository page in SourceCraft, go to Pull requests.
- In the top-right corner, click Create pull request.
- In the source drop-down list, select the
new-featurebranch, andmainin target. - Optionally, provide a name and description for the pull request.
- Click Publish pull request.
Merge with the main branch
- To see the changes made under the pull request, navigate to the Files changed tab.
- To approve the changes, click Approve in the top-right corner.
- Click Merge.
See also
- SourceCraft resource relationships
- Access management in SourceCraft
- Security in SourceCraft
- Importing or mirroring a repository in SourceCraft
- Configuring CI/CD in a SourceCraft repository
- Continuous integration and continuous deployment in SourceCraft
- Setting up approval rules in a SourceCraft repository
- Approval rules in SourceCraft
- Working with the SourceCraft REST API